What the heck is Docker?? imagine you have an app that works perfectly on your local machine, but when you try to deploy it on another server, its giving you the headaches by not working as intended. This is often due to the differences that happen to exist in the underlying OS, libraries, or other software dependencies. so what do you do in this case. yes, you guessed it! dockerize it.
Docker helps solve this problem by ensuring that the app and its dependencies are packaged together, creating a consistent and reliable environment that can be deployed across different systems.
You thinking…how does it solve it?? got you. its by containerization. What is containerization?? try to think it through based on what we talked in the above 2 paragraphs.
Yeah…you got it. Its packaging an app, along with all its dependencies (such as libraries, frameworks, and other software) into a single, portable, and self-contained unit called a container. Thats exactly what we are going to do now !
Spoiler Alert! I didn’t face this problem coz i didn’t try to deploy the API. I am solving the problem before it arrives 😉😉.
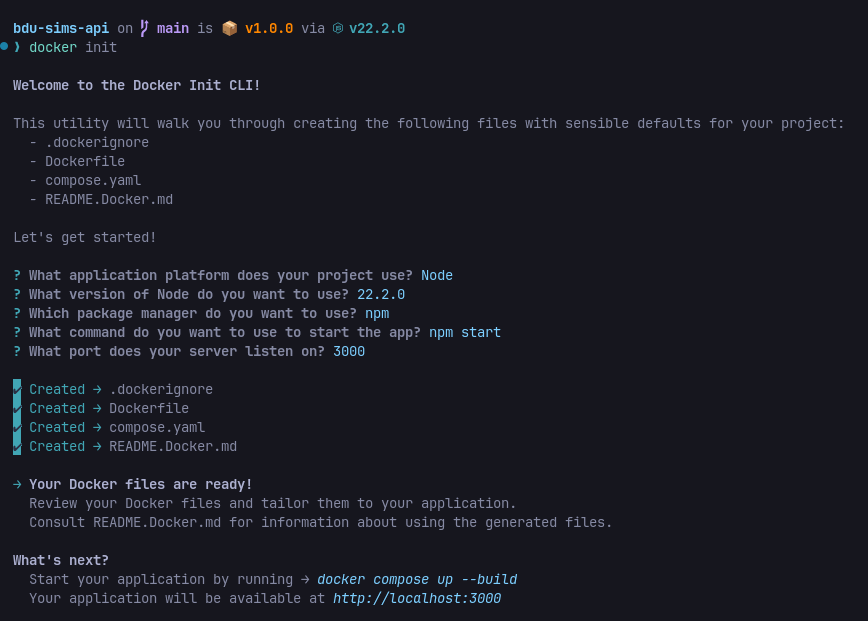
So as a fellow software engineer I started by searching “dockerizing node application” and i was lead to the official documentation which told me to run docker init in the root of my project. I did run that and got this.

Now, 4 files are created for us but we need only 2.
- Dockerfile
- compose.yaml (renamed to ‘docker-compose.yaml’)
Before continuing talking about the files let’s make on thing clear Image vs Container
Think of a Docker image as a blueprint or a recipe for a meal. Just like a recipe contains all the necessary ingredients and instructions to make a dish, a Docker image contains all the required files, libraries, and configuration to run an application. It’s a self-contained, portable, and standardized package that encapsulates everything needed to execute the application.
Now, imagine taking that recipe and actually cooking the meal. That’s analogous to creating a Docker container. A container is a running instance of a Docker image, much like a prepared dish is the result of following a recipe. When you run a Docker image, it creates a container that is isolated from the host operating system and other containers.
Each container has its own file system, network, and resource allocation, ensuring that the application inside the container runs consistently regardless of the host environment. Just as the same recipe can be used to make multiple servings of a dish, a single Docker image can be used to create multiple, identical containers.
AI came up with a pretty good analogy 😄
1. Dockerfile
so a Dockerfile is a text file that contains the instructions for building a Docker image like the recipe we talked about above
It specifies the base image to use, the files to copy into the image, the environment variables to set, and the commands to run when the container is started.
for instance here is the Dockerfile I used

For detail explanation, you can ask AI. but umma write what i understood here so
FROM - this is pulling the base image from docker-hub (this is like github) that we are going to run later as a container.
EXPOSE - exposes the given port to the host machine so that we can access it from the host machine
WORKDIR - sets our working directory inside the container (or the tiny VM, yeah i understand it like that)
RUN - runs commands that you give it inside the container. here i basically installed google-chrome-stable(for puppeteer) and nodemon(for watching file changes) inside the container and also the other dependencies found in package.json
COPY - copies my source code from the host machine to the container here (. . ) means copy all the files in the current directory (my project in the host machine) to the working directory (which is set using the WORKDIR above).
CMD - this is also to run commands. but what about RUN?? yeah they serve different purposes. RUN is for image building (tasks like dependency installation, running build scripts and so on) but CMD is when the container is launched. that is the difference (time of execution)
2. docker-compose.yaml

okay, the second file is docker-compose.yaml. honestly this maybe not needed because we need docker-compose for running multiple containers. And as you can see i have only one which is bdu-sims-api. but docker init created it so it must be good😄😄.
like i said you can run multiple containers using docker-compose but here there is only one called bdu-sims-api as you can see
ports - maps the express_port from the container to the host (like before to make it available in the host machine)
build - this is for building the image there is a dockerfile property that points to the dockerfile we talked about above in 1. here i give it the Dockefile the context (i don’t konw what that is) args is for arguments.(this is useful if we want to change port number at run time)
restart always restarts the container after failure
environment: exposes env variables from our .env file to the app running inside the container.
develop(i learned this today): is very essential when you are in development. because it lets you to sync files between the container and the host and also rebuild it when a depencency is added or deleted. it has a property called actions and you can list your actions like i did (sync, rebuild). search it up to know more
sooooooo, once this is done just run
docker compose up —build -w
up -> to initiate running the container
—build -> to first build it
-w -> to watch file changes and restart the app (this is achieved with docker compose -w flag and nodemon)
i created a npm script for this
npm run dev and it will run the above command

Now i can deploy this very easily.